
Map a User Group to an Cheetah Digital Access Group
When you create a User Group in the Zeta Login Administration environment, and you assign the Cheetah Digital application to it, you can map the User Group to an Cheetah Digitall Access Group. Within Cheetah Digital, an Access Group serves much the same function as a User Group, and controls access to various features of the application. With this mapping in place, a user added to a User Group will automatically also be added to the corresponding Access Group.
Note: This feature is available for Organization Administrators.
Map a User Group to an Access Group
The following steps assume that you have already created the User Group, and assigned the Cheetah Digital application to it. See Create a User Group for more information on this process. Make sure you know the Group Code for the desired User Group; this value can be found on the User Groups tab in the Administration environment.
These steps also assume that you have already created the Access Group within Cheetah Digital. See Security Settings for more information on this process.
To map a Zeta Login User Group to an Cheetah Digital Access Group:
-
Log into the Zeta Login User Workspace.
-
From the App Switcher, select Cheetah Digital.
-
Within Cheetah Digital, click your profile icon in the top-right corner of the screen. The Profile Info pop-up window is displayed.
-
Within the Profile Info pop-up window, click Account Security. The Security Settings screen is displayed.
-
Click Zeta Login Group Mapping. The Zeta Login Group Mapping pop-up window is displayed.
-
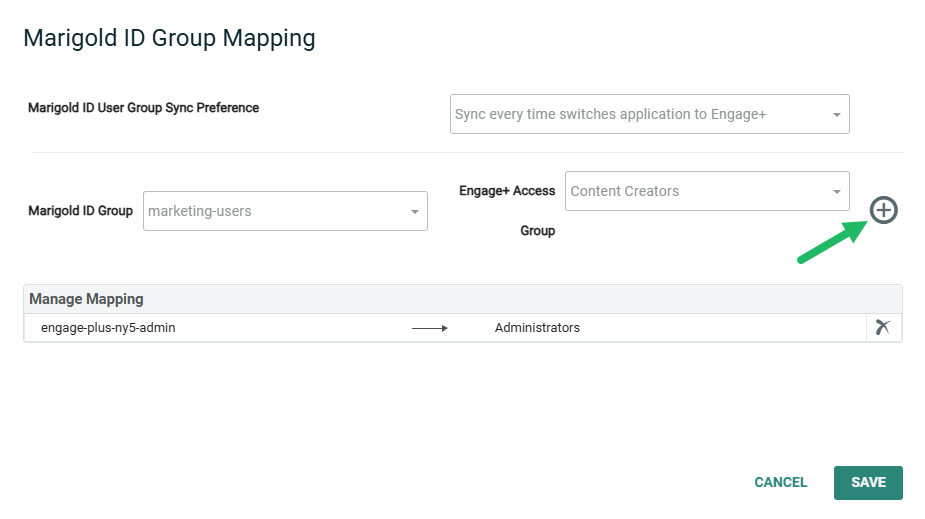
From the Zeta Login User Group Sync Preference drop-down menu, select one of the following options:
-
Sync only during new user creation: When a new Zeta Login user switches to Cheetah Digital for the first time only, the platform synchronizes their User Group membership with the corresponding Access Group membership. Existing users will not be synchronized.
-
Sync every time switches application to Cheetah Digital (default setting): Each time a new or existing user switches to Cheetah Digital, the platform synchronizes their User Group membership with the corresponding Access Group membership. This option is recommended. This process will never overwrite the user’s existing access in Cheetah Digital; however any new Access Groups will be added.
-
-
From the Zeta Login Group drop-down menu, select the Group Code for the desired User Group.
-
From the Cheetah Digital Access Group drop-down menu, select the desired Access Group.
-
Click the Add icon.
Remove User Group to Access Group Mapping
To remove an Cheetah Digital Access Group mapping:
-
Log into the Zeta Login User Workspace.
-
From the App Switcher, select Cheetah Digital.
-
Within Cheetah Digital, click your profile icon in the top-right corner of the screen. The Profile Info pop-up window is displayed.
-
Within the Profile Info pop-up window, click Account Security. The Security Settings screen is displayed.
-
Click Zeta Login Group Mapping. The Zeta Login Group Mapping pop-up window is displayed.
-
The Manage Mapping section displays all current mapping. Click the Delete icon next to the desired mapping.
